


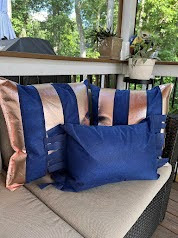
Let’s transform your outdoor space into a cozy and stylish spot this summer! One way to do that is to add some color with new throw pillows! Today I will be using Oly*Fun fabric and Poly-fil Weather Soft Pillow forms! In this blog post, we’ll walk you through the steps to make your own outdoor pillows.
Materials You’ll Need
Before you get started, gather the following materials:
- Oly*Fun fabric (choose your favorite colors) I’m using two colors today!
- Pillow inserts (suitable for outdoor use) I’m using Poly-fil Weather Soft in a 18 inch square and a 12 x 18 inch rectangle
- Scissors
- Measuring tape
- Sewing machine
- Pins or clips (If using metallic Oly*Fun you may want to use clips to avoid puncturing the material)
Step-by-Step Guide for Striped Pillow Case
Step 1: Measure and Cut the Fabric
- Measure the Pillow Insert: Measure the dimensions of your pillow insert. Add an extra inch to each measurement to allow for seams. Mine is an 18 x 18 inch square so I will need one piece of square material that is 19 x 19 inches for the back. For the stripes, I want 6 stripes, so these will be 4×19 inches each.
- Cut the Fabric: Using your measurements, cut one piece of Oly*Fun fabric from the color of your choice. In addition, cut three 4 x 19 inch strips in one color, and then three 4 x 19 inch in the opposite color.
Step 2: Sew the Fabric
- Align the stripes: match one stripe of color 1 and one stripe of color 2 with right sides together. Clip the fabric in place. Repeat this step so you have three pairs.
- Sew the Edges: Using your sewing machine, sew up each pair using a straight stitch.
- Finger press the seam allowance open, or rub the seam allowance against a hard table edge to help it lay flatter. Top stitch the fabric by taking a seam about 1/4 inch away from the original seam. See photos below. Repeat with each pair.
- With right sides together, align the newly sewn stripes again, so once the seam is complete you would have four sewn stripes. Repeat the pressing and top stitching step from above, and then repeat all of this for the last pair of stripes. At the end, you should have the six stripes sewn together and top stitched.
Step 3: Attach the Backing
- With right sides together, match the 19 x 19 inch piece of fabric cut at the beginning with the newly sewn striped front. Clip three of the four edges up. For the fourth edge, clip about 1.5 inches up on either side. In the photo below, I used double quilting clips to denote where I would be starting and stopping.
- Take a seam starting at the first double clip on the fourth edge, all the way around to the last clip on the fourth edge. You should be leaving a large gap for the pillow form to go into.
- Trim any extra fabric off the edges, trim any threads, and turn the pillow case right side out.
Step 3: Finishing the Pillow
- Insert the Pillow: Gently insert the pillow into the case, making sure it fits in the newly sewn case.
- Fold and Clip the Edges: Fold the raw edges of the open side inward about half an inch. Clip them together.
- Machine Sew the Opening: Sew the newly clipped side closed using a straight stitch close to the edge.
- Your pillow is complete!
Step-by-Step Guide for Fringe Pillow Case
Step 1: Measure and Cut the Fabric
- Measure the Pillow Insert: Measure the dimensions of your pillow insert. Add an extra inch to each measurement to allow for seams. Mine is a 12 x 18 inch rectangle so I will need two pieces of 13 x 19 inch rectangular material, and for the fringe we need two 4 x 12 inch rectangles.
- Cut the Fabric: Using your measurements, cut out the Oly*Fun fabric so you have four rectangles. There will be two 13 x 19 inch and two 4 x 12 inch if you are using a 12 x 18 inch pillow form.
Step 2: Sew the Fabric:
- Align the fabric: Lay one 13 x 19 inch rectangle with the right side facing up. Place one 4 x 12 inch rectangle on either end of the larger rectangle. The smaller rectangle should be aligned about 1/2 inch from the top and bottom of the short edge.
- Clip the fabric: Lay the second 13×19 inch rectangle on top of the others with right side down. You should now have a sandwich of the outside fabric, the fringe pieces inside the two large rectangles, and the second piece of outside fabric. Clip the material all in place.
- Sew the pillow case: Starting about half an inch away from the corner on one short edge, sew the pillow case and pieces together. Be sure to not catch the fringe rectangle in the seam. Continue sewing all the way around until you are back at the same edge. Sew about a half inch down again and then end the seam.
- Sew the second fringe piece on: Sew the shorter rectangle to the edge by not including the third piece of fabric. This will give you an opening to put your pillow into.
Step 3: Finishing the Pillow
- Trim any threads: Trim any threads and turn your pillow case right side out. If done correctly, you should have a flap on either short end of the pillow case.
- Fold and Clip the Edge: Fold the raw edge of the open side inward about half an inch. Leave the fringe rectangle free. Clip/pin this to the front of the pillow case.
- Machine Sew the Opening: Sew the newly pinned side closed using a straight stitch close to the edge.
- Create the Fringe: For each rectangle flap, cut one inch strips using scissors to create a fun effect.
- Your pillow case is complete!
Making outdoor pillow cases with Oly*Fun fabric is an easy project that can add design to your outdoor space! With its durable and water-resistant properties, Oly*Fun ensures your pillows will withstand the elements while adding a pop of color and comfort.
Check out the video tutorial for more information!
Like your tutorial on Outdoor pillow Easy to use Do you have anything for out
door flags
Thank you! Here are a few:
https://www.fairfieldworld.com/project/patriotic-garden-flag/
https://www.fairfieldworld.com/project/diy-waves-spring-outdoor-flag/
https://www.fairfieldworld.com/project/patriotic-bunting-inspired-by-pottery-barn/